Create local topography maps from different DEM sources with OGGM#
There are a number of datasets available out-of-the box in OGGM. This Notebook will show you how to download the original sources and create the local glacier centered map. It is also possible to use your own DEM data in OGGM.
Set-up#
import rioxarray as rioxr
import matplotlib.pyplot as plt
import oggm
from oggm import cfg, utils, workflow, tasks, graphics
from oggm.core import gis
cfg.initialize(logging_level='WARNING')
cfg.PARAMS['border'] = 10
2026-07-20 12:59:31: oggm.cfg: Reading default parameters from the OGGM `params.cfg` configuration file.
2026-07-20 12:59:31: oggm.cfg: Multiprocessing switched OFF according to the parameter file.
2026-07-20 12:59:31: oggm.cfg: Multiprocessing: using all available processors (N=4)
2026-07-20 12:59:31: oggm.cfg: PARAMS['border'] changed from `80` to `10`.
RGI outlines#
We use the RGI outlines to identify the necessary DEM tiles. If you haven’t downloaded the RGI files yet, this will also download them. Feel free to use your desired RGI-ID here, otherwise let’s use the Hintereisferner glacier as an example.
entity = utils.get_rgi_glacier_entities(['RGI60-11.00897'], version='62')
entity.plot();

Choose a DEM source (e.g. SRTM)#
If not specifying anything, OGGM will use its default settings, i.e. NASADEM for mid- and low-latitudes (60°S-60°N). However, this needs registration at NASA Earthdata (see “Register” below). Here, we choose the SRTM source as example DEM (no registration necessary).
# Let's make a working directory for this DEM
cfg.PATHS['working_dir'] = utils.gettempdir('default', reset=True)
gdir = workflow.init_glacier_directories(entity)[0]
tasks.define_glacier_region(gdir, source='SRTM')
# if not yet installed, you have to install rasterio
2026-07-20 12:59:31: oggm.workflow: Execute entity tasks [GlacierDirectory] on 1 glaciers
You can access the (reprojected and interpolated) DEM file in the working directory:
dem_path = gdir.get_filepath('dem')
dem_path
'/tmp/OGGM/default/per_glacier/RGI60-11/RGI60-11.00/RGI60-11.00897/dem.tif'
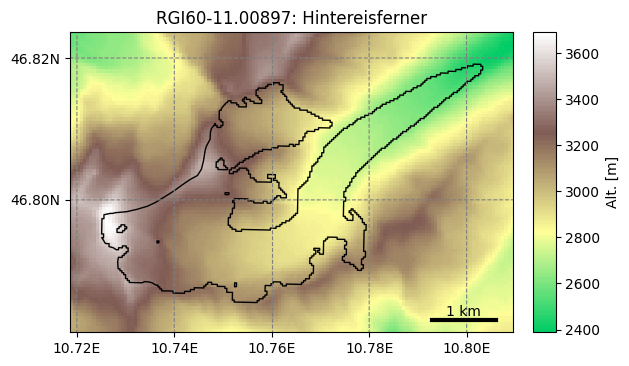
It is a geotiff file. Xarray can open them thanks to rasterio:
da = rioxr.open_rasterio(dem_path)
f, ax = plt.subplots()
da.plot(cmap='terrain', ax=ax)
# Add the outlines
gdir.read_shapefile('outlines').plot(ax=ax, color='none', edgecolor='black');

The source of the DEM is documented in the directory itself:
with open(gdir.get_filepath('dem_source'), 'r') as f:
    print(f.read())
SRTM V4

Original resolution: 3 arcsec (~90m)
Date of acquisition: February 2000
Date range: 2000-2000

# Data Citation

We kindly ask  any users to  cite this data  in any published  material
produced using this data, and if possible link web pages to the CIAT-CSI
SRTM website (http://srtm.csi.cgiar.org).

Citations should be made as follows:

Jarvis A., H.I. Reuter, A.  Nelson, E. Guevara, 2008, Hole-filled seamless SRTM
data V4, International  Centre for Tropical  Agriculture (CIAT), available
from http://srtm.csi.cgiar.org,


# Data files

srtm_39_03.tif
OGGM is neither the owner nor the distributor of these datasets! OGGM only provides tools to access it. It is your responsibility as the data user to read the individual usage requirements and cite and acknowledge the original data sources accordingly.
OGGM provided datasets#
At the moment OGGM is able to download and process the following DEM sources:
for src in utils.DEM_SOURCES:
    print('{:<10}: {}'.format(src, gis.DEM_SOURCE_INFO[src].split('\n')[0]))
GIMP      : GIMP V1.1
ARCTICDEM : ARCTICDEM V3
RAMP      : RAMP V2
TANDEM    : TanDEM-X 90m
AW3D30    : AW3D30 V1804
MAPZEN    : MAPZEN TERRAIN TILES
DEM3      : VIEWFINDER PANORAMAS DEMs
ASTER     : ASTGTMV3
SRTM      : SRTM V4
REMA      : REMA V1.1
ALASKA    : ALASKA V3
COPDEM30  : Copernicus DEM GLO-30
COPDEM90  : Copernicus DEM GLO-90
NASADEM   : NASADEM Merged DEM Global
Register for online datasets#
The default DEM source for low and mid-latitudes (60°S-60°N), NASADEM, requires a user account to download data, so you need to register at NASA Earthdata. There are other DEM sources where a registration is necessary; for ASTGTMV3 at NASA Earthdata, for TanDEM-X at DLR, and for COPDEM at spacedata.copernicus.eu/.
After that you can use the command line functionality oggm_netrc_credentials to store your user credentials in a local ~/.netrc file. Your user credentials are only stored locally and are only used by the download function for authentification with the original DEM source. Credentials are not needed if you use the RGI-TOPO data (see below).
Use pre-processed DEMs from RGI-TOPO#
The RGI-TOPO dataset is an RGI-provided dataset in beta release. These data are available for everyone, and were created with OGGM. Of course, you can easily use these data in OGGM as well:
# use NASADEM, the default DEM for low and mid-latitudes in OGGM, you can also change to e.g. 'COPDEM'
from oggm.shop import rgitopo
cfg.PATHS['working_dir'] = utils.gettempdir('rgitopo', reset=True)
gdir = rgitopo.init_glacier_directories_from_rgitopo(['RGI60-11.00897'], dem_source='NASADEM')[0]
graphics.plot_domain(gdir)
2026-07-20 12:59:36: oggm.workflow: init_glacier_directories from prepro level 1 on 1 glaciers.
2026-07-20 12:59:36: oggm.workflow: Execute entity tasks [gdir_from_prepro] on 1 glaciers
2026-07-20 12:59:44: oggm.workflow: Execute entity tasks [select_dem_from_dir] on 1 glaciers
Use another DEM source#
Using RGI-TOPO DEMs is by far the easiest since all data is prepared for you and ready to use. But if you really want, you can go back to the original data sources:
# Let's make a working directory for this DEM
cfg.PATHS['working_dir'] = utils.gettempdir('alternative')
try:
    gdir = workflow.init_glacier_directories(entity)[0]
    tasks.define_glacier_region(gdir, source='DEM3')
except oggm.exceptions.InvalidDEMError as err:
    print(err)
2026-07-20 12:59:44: oggm.workflow: Execute entity tasks [GlacierDirectory] on 1 glaciers
Let’s check that the source text is updated as well:
with open(gdir.get_filepath('dem_source'), 'r') as f:
    print(f.read())
VIEWFINDER PANORAMAS DEMs

Original resolution: 3 arcsec (~90m)
Date of acquisition: Depending on original source

These data are downloaded from Jonathan de Ferranti's webpage:
http://viewfinderpanoramas.org/dem3.html

# Data Citation

There is no recommended citation for these data. Please refer to the website
above in case of doubt.


# Data files

L32.tif
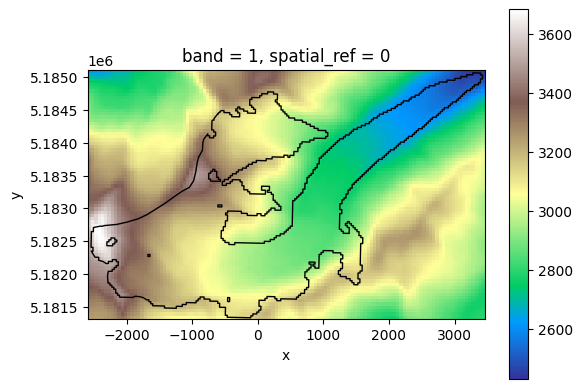
f, ax = plt.subplots()
da_dem3 = rioxr.open_rasterio(gdir.get_filepath('dem'))
da_dem3.plot(cmap='terrain', ax=ax)
gdir.read_shapefile('outlines').plot(ax=ax, color='none', edgecolor='black');

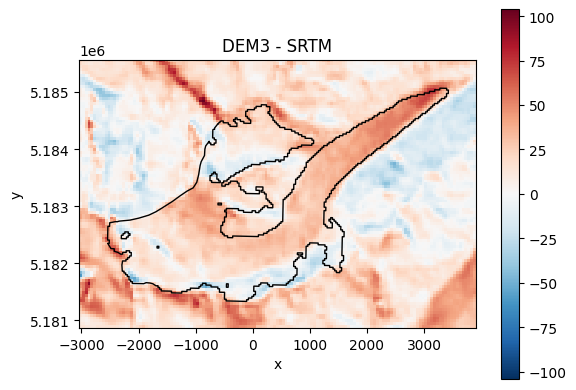
There might not be much difference a first sight, but by subtracting them the difference become clear:
f, ax = plt.subplots()
(da_dem3 - da).plot(ax=ax)
plt.title('DEM3 - SRTM')
gdir.read_shapefile('outlines').plot(ax=ax, color='none', edgecolor='black');
Regional DEMs / DEM availability#
Of course not all sources are available for every glacier as some of the DEMs are regional only. If we for example try the GIMP DEM, which is a Greenland specific DEM, it will not work for glaciers outside that region:
# Let's make a working directory for this DEM
cfg.PATHS['working_dir'] = utils.gettempdir('gimp', reset=True)
try:
    gdir = workflow.init_glacier_directories(entity)[0]
    tasks.define_glacier_region(gdir, source='GIMP')
except oggm.exceptions.InvalidWorkflowError as err:
    print(err)
Source: GIMP is not available for the glacier RGI60-11.00897 with border 10
2026-07-20 12:59:50: oggm.workflow: Execute entity tasks [GlacierDirectory] on 1 glaciers
2026-07-20 12:59:51: oggm.core.gis: InvalidWorkflowError occurred during task define_glacier_region on RGI60-11.00897: Source: GIMP is not available for the glacier RGI60-11.00897 with border 10
User provided DEM#
Users should be able to use any DEM file which can be opened by rasterio (i.e. geotiff). Here, we use a subset SRTM file shipped with OGGM as an example:
custom_dem_path = utils.get_demo_file('hef_srtm.tif')
custom_dem_path
'/github/home/.oggm/oggm-sample-data-df58aaf6b55390ab831e4bd28815a9c3070f5235/test-files/hef_srtm.tif'
We tell OGGM to use it by changing the entry in the RGI table and by giving the path to the file:
cfg.PATHS['dem_file'] = custom_dem_path
cfg.PATHS['working_dir'] = utils.gettempdir('user', reset=True)
gdir = workflow.init_glacier_directories(entity)[0]
tasks.define_glacier_region(gdir, source='USER')
2026-07-20 12:59:51: oggm.workflow: Execute entity tasks [GlacierDirectory] on 1 glaciers
Now the user provided DEM is used:
f, ax = plt.subplots()
da_user = rioxr.open_rasterio(gdir.get_filepath('dem'))
da_user.plot(cmap='terrain', ax=ax)
gdir.read_shapefile('outlines').plot(ax=ax, color='none', edgecolor='black');

The border value, or how to choose the size of the topographic map#
It is possible to specify the extent of the local topographic map. All maps are centered on the glacier and the size of the map is determined in grid points around the glacier. The number of grid points that was used in this example are 10 in order to save storage. But depending on your study you might need a larger topographic map.
OGGM’s pre-processed directories come in 4 border sizes: 10, 40, 80 and 160. But if you process the topography yourself you can choose every value.
# print the currently used number of gridpoints around a glacier
cfg.PARAMS['border']
10
cfg.PARAMS['border'] = 1
2026-07-20 12:59:52: oggm.cfg: PARAMS['border'] changed from `10` to `1`.
# Let's make a working directory for this DEM
cfg.PATHS['working_dir'] = utils.gettempdir('border1')
gdir = workflow.init_glacier_directories(entity)[0]
tasks.define_glacier_region(gdir)
da = rioxr.open_rasterio(gdir.get_filepath('dem'))
f, ax = plt.subplots()
da.plot(cmap='terrain', ax=ax)
# Add the outlines
gdir.read_shapefile('outlines').plot(ax=ax, color='none', edgecolor='black');
2026-07-20 12:59:52: oggm.workflow: Execute entity tasks [GlacierDirectory] on 1 glaciers
cfg.PARAMS['border'] = 100
2026-07-20 12:59:52: oggm.cfg: PARAMS['border'] changed from `1` to `100`.
# Let's make a working directory for this DEM
cfg.PATHS['working_dir'] = utils.gettempdir('border100')
gdir = workflow.init_glacier_directories(entity)[0]
tasks.define_glacier_region(gdir)
da = rioxr.open_rasterio(gdir.get_filepath('dem'))
f, ax = plt.subplots()
da.plot(cmap='terrain', ax=ax)
# Add the outlines
gdir.read_shapefile('outlines').plot(ax=ax, color='none', edgecolor='black');
2026-07-20 12:59:52: oggm.workflow: Execute entity tasks [GlacierDirectory] on 1 glaciers

What’s next?#
return to the OGGM documentation
back to the table of contents